
Part I: Deployment and Container Orchestration
Part II: Container Security
Part III: Container Deployment
Part IV: Introduction to Kubernetes
Part V: Kubernetes Administration
Part VI: Kubernetes Security Checklist
Kubernetes Security Best Practices Checklist
In this post, we will provide a Kubernetes security checklist, which is a critical topic in cloud native security, covering authentication, network isolation, audit logging for incident response, and more. In the previous post in this series we covered Kubernetes administration, an important precursor to understanding how to secure Kubernetes. While Kubernetes offers administrators and developers a number of security-related features, it does not handle security for you out of the box, so let’s get started understanding your Kubernetes security best practices checklist.
If you have the following covered, and/or are aware that they need to be, you are well on your way to securing your Kubernetes environment.
![]() Use Strong Authentication Methods: Employ built-in Kubernetes strategies or a third-party identity provider to authenticate end-users and service-based accounts
Use Strong Authentication Methods: Employ built-in Kubernetes strategies or a third-party identity provider to authenticate end-users and service-based accounts
![]() Implement Role-Based Access Control (RBAC): Configure appropriate, least-privilege access levels for users and services.
Implement Role-Based Access Control (RBAC): Configure appropriate, least-privilege access levels for users and services.
![]() Secure Kubelet Communications: Protect kubelet access with proper authentication and authorization.
Secure Kubelet Communications: Protect kubelet access with proper authentication and authorization.
![]() Manage Secrets Carefully: Encrypt Kubernetes secrets for sensitive information and limit access to them.
Manage Secrets Carefully: Encrypt Kubernetes secrets for sensitive information and limit access to them.
![]() Use Admission Controllers: Use admission controllers for policy enforcement and to audit API requests.
Use Admission Controllers: Use admission controllers for policy enforcement and to audit API requests.
![]() Use Namespaces: Use the LimitRanger and ResourceQuota admission templates to prevent resource deprivation
Use Namespaces: Use the LimitRanger and ResourceQuota admission templates to prevent resource deprivation
![]() Use SecurityContext and Kubernetes Security Policies: Define pod security policies that restrict the capabilities of containers.
Use SecurityContext and Kubernetes Security Policies: Define pod security policies that restrict the capabilities of containers.
![]() Use a Multi-Cluster Architecture: Multiple clusters take up more resources than the single cluster model, butit is a more resilient architecture from a security perspective.
Use a Multi-Cluster Architecture: Multiple clusters take up more resources than the single cluster model, butit is a more resilient architecture from a security perspective.
![]() Isolate Workloads: Apply network policies to restrict traffic between pods.
Isolate Workloads: Apply network policies to restrict traffic between pods.
![]() Audit Log Monitoring: Keep and monitor audit logs for all activity.
Audit Log Monitoring: Keep and monitor audit logs for all activity.
![]() Secure Open Defaults: Always harden your Kubernetes cluster and check that your defenses are up manually.
Secure Open Defaults: Always harden your Kubernetes cluster and check that your defenses are up manually.
![]() Limit Third-Party Resources: When enabling an integration, make sure to review the permissions that an extension requests before granting it access.
Limit Third-Party Resources: When enabling an integration, make sure to review the permissions that an extension requests before granting it access.
Kubernetes Authentication
Authentication is vital when it comes to distributed container orchestration systems such as Kubernetes. Without proper authentication in place, the entire system fails. In a Kubernetes cluster, there are two major categories of users: service accounts and normal "human" users.
Service accounts are users managed by the Kubernetes API and are tied to a set of credentials stored in etcd as a Secret object. Service accounts are designed for systems or applications and not end users such as a system administrator.
Kubernetes does not have objects to manage end users inherently. It assumes that “human” users are managed outside of Kubernetes – for example, in an LDAP directory or through a protocol such as Kerberos or SAML.
Kubernetes Authentication for End Users
There are a variety of methods available for performing actions on a Kubernetes cluster. If an end user (such as a cluster administrator) is the one performing an action, chances are they will use kubectl or visit a dashboard directly. But how does this individual authenticate to the Kubernetes cluster to ensure they are authorized to perform a given action? This is where built-in Kubernetes strategies come into the picture.
X509 Client Certificates
One of the most widely adopted methods used to authenticate against the Kubernetes API is using public key infrastructure (PKI). This avoids the need to store and distribute hardcoded credentials such as passwords or tokens. Kubernetes allows for the use of X509 certificates to be passed with a request to the API server. If a client certificate is presented and verified, the common name of the subject is used as the user name for the request. Certificates can also indicate a userʼs group memberships using the certificateʼs organization fields.
If the request cannot be authenticated, it is rejected with HTTP status code 401. Otherwise, the user is authenticated as a specific username, and the username is available to use in decisions for subsequent steps.
The security around creation, distribution, and revocation of certificates is still something that requires attention to prevent compromise. Be careful when using certificates for end user authentication. Currently, the Kubernetes API has no way to revoke certificates, and in any case certificate management can be complex.
Static Token File
Kubernetes supports static tokens and static passwords as a method of authentication. While this may appear to be the easiest way to incorporate authentication on the cluster, extreme caution should be taken when using static credentials. Storing long-lived passwords or tokens that are tied to privileged accounts is asking for trouble. In the event of a compromise, it would be trivial for an attacker to impersonate a user by simply reusing the password in a request. Always use short-lived authentication tokens.
OpenID Connect Tokens
OpenID Connect support in Kubernetes allows authentication via a third-party identity provider (IdP) such as Google or Github. This is becoming a popular method for Kubernetes authentication due to the increasing reliance on IdPs as an authentication mechanism across organizations.
Authentication for Service Accounts
Service accounts can be used for systems and applications outside or inside the cluster to perform actions programmatically. Service account tokens can be created using a command such as kubectl create serviceaccount jenkins or using a manifest file. The service account tokens are stored as a Secret object type in etcd.
Since service account tokens are generally long-lived, it is crucial to narrowly scope the permissions associated with the token and create log entries whenever the token successfully or unsuccessfully accesses a resource within the cluster. Avoid using service account tokens from outside the cluster as you will be opening up your cluster to significant risk.
Kubernetes Authentication Best Practices
Ultimately, administrators and security teams should choose an authentication mechanism for the API servers to use that matches the common access patterns when you install a cluster. You can always choose a third- party identity provider such as Azure, Google, or GitHub. Using X.509 certificates is always preferable compared to static files. For larger clusters, you may wish to integrate an existing OIDC server that allows users to be subdivided into groups and centrally managed. Last but not least, manage the lifecycle of identities and credentials. For example, make sure you invalidate credentials of those leaving the organization.
Kubernetes Authorization
Authentication is only one piece of the security puzzle when it comes to locking down a Kubernetes cluster. By default, an administrator of a Kubernetes cluster can do a lot. Reading secrets, launching applications, changing configurations, removing security controls – you name it! We want a way to share the cluster with others while limiting individual permissions to only what is needed to carry out a job and nothing more. This is where authorization comes in.
Role-based access control
Role-based access control (RBAC) regulates access to computer or network resources based on the roles of individual users within an enterprise. RBAC can sometimes be confused with Cloud IAM, but it’s important to understand that RBAC is authorization while Cloud IAM is authentication. Even though Kubernetes in general hasnʼt been designed with security in mind, RBAC can be used to control access to any resources: pods, logs, controllers, and more. In this context, access is the ability of an individual user to perform a specific task – such as viewing, creating, or modifying a file.
RBAC is the preferred method for creating robust roles and access policies in Kubernetes. There are two types of roles that you can use:
-
- ClusterRoles which are permissions that apply to the entire cluster.
- Roles which are permissions that apply to resources within one namespace.
You can use Roles to manage permission on a more granular basis. ClusterRoles can be useful for managing resources that exist at the cluster level only, such as nodes. Verbs are used to define specific actions that accounts can perform on resources.
In order to use RBAC, first you need to define users and service accounts and create keys and certificates for them. Then, you must register credentials and configuration context for these users. You are now ready to create a Role or ClusterRole and define actions that can be performed on resources. Here is an example ClusterRole manifest named secret-reader that creates a role that grants get, watch, and list permissions to the secrets resource. This role is applied cluster-wide, as it is a ClusterRole type.
kind: ClusterRole
apiVersion:
rbac.authorization.k8s.io/v1
metadata:
name: secret-reader
rules:
apiGroups: [""]
resources: ["secrets"]
verbs: ["get", "watch", "list"]
To place users or groups into this role, you must create a RoleBinding or ClusterRoleBinding which binds the role to the user. The following RoleBinding gives the user jimmy access to the secret-reader ClusterRole.
kind: RoleBinding
apiVersion: rbac.authorization.k8s.io/v1
metadata:
name: read-secrets
namespace: development
subjects:
- kind: User
name: jimmy
apiGroup:rbac.authorization.k8s.io
roleRef:
kind: ClusterRole
name: secret-reader
apiGroup:rbac.authorization.k8s.io
Kubernetes Authorization Best Practices
Use role-based access control to control access in Kubernetes and follow these best practices to avoid overly permissive RBAC policies. Create a dedicated service account for each application that requires access to the API server. Use RBAC to limit access according to the needs of the specific application. Prefer using Roles rather than ClusterRoles to enforce the least privilege principle. Also, avoid using wildcards when you define verbs or access to resources.
Be careful when using the built-in Kubernetes superuser called cluster-admin . This user can perform any action on any resource within a cluster. As you can understand this level of permission is extremely dangerous.
Even though Kubernetes doesnʼt have default users, it creates default service accounts to identify processes running in a pod. You should not be using them. Instead, create your service-specific accounts to implement more granular access control.
Most applications donʼt need to talk to the API Server and, thus, they donʼt need an access token. For this reason, it is suggested to disable auto-mounting of the default service account token.
Authorization and user access control is not a one-off project but rather a continuous process. You should be reviewing and updating your RBAC policies continuously, especially whenever you create, remove, or update permissions of any user or service account, or when you create a namespace or pods.
Kubelet Config
As discussed in the previous lesson, the kubelet is a process that runs on each of the nodes within a Kubernetes cluster. Like all other components in Kubernetes, the kubelet is an API. It is responsible for managing containers on the nodes themselves and interacting with the Container Runtime Interface (CRI). It is crucial to ensure the kubelet API is locked down appropriately.
The kubelet exposes two ports:
- 10255. A read-only port that returns a wealth of information about the pods and containers running on a given node.
- 10250. A read/write port that has the ability to schedule pods on a node.
The following should be considered when deploying a Kubernetes cluster to ensure the kubelet is not left in a vulnerable state:
- Always run nodes on internal networks as a layer of defense.
- Apply strict firewall rules to allow only the Kubernetes master to talk to the kubelet.
- Disable anonymous access. Ensure you start the kubelet using the --anonymous-auth=false flag. Ensure that all requests to the kubelet are
- authorized. When starting the kubelet, set the -- authorization-mode to anything other than AlwaysAllow .
- Limit the permissions of kubelets. You can use the NodeRestriction admission plugin to ensure that a kubelet can modify only pods that are bound to it and its own Node object.
- Ensure certificate-based authentication is in place and properly configured between the master and nodes.
- Enable automatic kubelet certificate rotation by using the --rotate-certificates flag.
- Turn off the read-only port by setting -read-only- port=0 . This will limit exposing information about the workloads that you are running.
- Test all controls manually to ensure the kubelet is actually inaccessible.
Secrets Management
The Kubernetes Secret objects are designed to store small amounts of sensitive data such as API keys, tokens, or passwords. These bits of data are then accessible to internal Kubernetes components (such as pods) and are only sent to a node if a pod on that node requires it. Secrets should be handled with great care, as they are often a target for attackers.
The default storage for secrets in Kubernetes is the etcd database. Information stored there is just base64- encoded, which doesnʼt provide any kind of security. You should control access to etcd, and also encrypt your etcd cluster (donʼt store the encryption key on the same host!). If you have multiple etcd nodes, make sure you encrypt communications between them.
Following the least privilege principle, containerized code should be able to read only the secrets that it needs. Node authorization ensures that a kubelet can access only secrets related to pods scheduled to its node. Ensure that this functionality is turned on by checking that --enable-admissions-plugins includes NodeRestriction . Ideally, you should have a different set of secrets for different environments, namely development, testing, and production.
As a general rule, donʼt build secrets into images. This is a bad practice both in terms of security and operations. Security-wise, anyone with access to the image will be able to obtain the secrets in it. Additionally, secrets can leak into source code repositories, such as GitHub. From an operational perspective, any time you want to change a secretʼs value, you will have to rebuild the image.
You can pass secrets into a pod using environment variables. This will allow your pod to refer to secrets by name rather than value. You should still be cautious, as secrets may still be written to logs when something crashes. Also, secrets in environment variables appear in kubectl describe pod. Anyone who can run these commands will potentially have access to secrets as well.
Alternatively, you can consider passing secrets in files, which is your best option security-wise. In detail, you can write secrets into files that the container can access through a mounted volume. For increased security, the mounted volume can be a temporary directory in memory rather than written to disk.
A process for secret rotation and revocation must be established. You may choose different approaches depending on how secrets are stored and passed to containers. For example, in some cases an application might have to be restarted in order to read a new database password. If you are using the file-based approach, the secrets in the file can be updated without
Admission Controllers
Admission controllers are an extensible solution for performing security checks that go above and beyond authentication, authorization and network security controls you can enforce through other types of Kubernetes policy frameworks. They can be used to evaluate requests to the Kubernetes API server and determine whether to allow the request or not. You can consider Admission Controllers as a second line of defense, that check for invalid requests that may have slipped past RBAC, or other types of security controls.
Compared to RBAC, Admission Controllers are more flexible, as they use rules based on parameters that cannot be configured through RBAC. For example, they can limit resources, or prevent a command from being executed in a privileged container.
When the API server receives a request from a client, it must verify that it is authenticated and the client is authorized to perform the requested operation. If the API server determines that the specific action on the resource is permitted, the request is passed to the admission controllers.
There are more than 30 controllers available, and a few of them are quite important security-wise:
- AlwaysPullImages : Requires every pod to always pull an image, instead of using the one stored locally at the node. When pods use images stored locally, they may bypass authorization checks and access images they are not allowed to.
- PodSecurityStandard : Acts on the creation and modification of the pod, and determines whether it should be admitted based on the requested security context and the available policies. We will discuss policies in more detail later on in this lesson.
- LimitRanger and ResourceQuota : These controllers observe the incoming request and ensure that it does not violate constraints set in the LimitRange and ResourceQuota objects in the Namespace. These controllers will help prevent denial of service attacks.
- NodeRestriction : Limits the permissions of each kubelet so that it can only modify pods that are bound to it or its Node object.
As a best practice, you should consider enabling at least the default set of admission controllers provided by Kubernetes.
Kubernetes Security Boundaries
The basic building blocks of Kubernetes can be used to set security boundaries and prevent a process from affecting other processes or accessing other users' data.
In that sense you should create different clusters for different teams or environments (such as development, test, and production).
At the Namespace level, we can use the LimitRanger and ResourceQuota admission templates to prevent resource deprivation. As far as pods are concerned, you can define a security context and enforce it as well as policies that offer isolation.
Security Context and Kubernetes Security Policies
Kubernetes provides two security mechanisms that allow you to restrict what processes can do within a pod and how pods are allowed to communicate.
Kubernetes Security Context
A Kubernetes security context defines privilege and access control settings on the pod or the container level. The security context is specified in the securityContext field in the pod configuration or the container manifest. It allows you to implement discretionary access control and set permissions to access objects based on the user or group ID, as well as configure it to run as a privileged or unprivileged process.
Using Security Contexts you can define rules which are enforced internally or integrate with external security context tools, such as AppArmor and SELinux. For example, you can use seccomp to filter system calls for processes, AppArmor to restrict the capabilities of individual programs, and SELinux to assign security labels to objects and apply mandatory access control.
You can be very granular with Security Contexts and assign each resource specific permissions required to access resources on the host server and deny access to others. They can be really useful as far as privileged pods and containers are concerned. Instead of providing root access to a user, you can use capabilities to give a specific set of privileges. Practically, you can use parameters to allow the pod or container to run in privileged mode and at the same time deny certain actions. For example, you can allow a container to bind a certain port or execute some external binaries and deny access to resources outside the container.
Security Contexts are similar to RBAC policies, but at the same time quite different. First of all, Security Contexts are more restrictive in terms of rules that you can apply. They are used to assign permissions to pods only, whereas RBAC can be applied to a variety of Kubernetes resources. Furthermore, they can be extended through integrations with external frameworks, such as AppArmor and SELinux.
To use Security Contexts, you simply need to include the Security Context code within the deployment file that you create when deploying a pod. For integration with external frameworks, you first need to install AppArmor or SELinux on every node in your cluster and load the profile that youʼll be using. Then, you have to add a security context to your deployment file that references the external Security Context profile.
Kubernetes is a very agile platform and it automatically assigns pods or containers to nodes. Thus, when you are designing your Kubernetes architecture, you cannot know which node will host which container or host. This is how the lifecycle can be so ephemeral. This is why we suggest loading the profile on each node in your cluster. However, profile deployment can be hard. You can automate this process up to a certain extent, but even automation requires time and effort. You may have nodes that run different Linux distributions, that require different AppArmor or SELinux setup. This can definitely complicate profile deployment across nodes.
Security Contexts are a very useful tool that allow you to define security-related parameters on a resource-by-resource basis, but they also have some limitations.
First of all, there is no support for Windows containers. Additionally, they can be used only to define permissions for pods or containers. Use RBAC to secure other resources such as nodes, users, and service accounts.
Kubernetes Pod Security Policy
Pod security policies enable fine-grained authorization of pod creation and updates. They are a cluster-level resource that allow you to enforce the usage of security contexts using admission controllers. They are often applied as the last step before a pod is actually scheduled on a node. If the pod doesnʼt meet the requirements of the pod security policy, it will not run.
Pod security policies were deprecated in Kubernetes v1.21 and will be removed from Kubernetes in v1.25. If you are using pod security policies, you need to migrate to the Pod Security admission controller. Pod security standards have enough complexity involved that they deserve their own separate write-up.
Limit Third-Party Resources
Third-party integrations to Kubernetes may have excessive privileges and open up your cluster to unnecessary risk. When enabling an integration, make sure to review the permissions that an extension requests before granting it access. For example, many security integrations may require access to list all secrets on your cluster, effectively making that component a cluster admin. Restrict the integration to functioning in a single namespace if possible.
Components that create pods may also require elevated privileges if they can operate in default Kubernetes namespaces such as kube-system . Pods that request elevated privileges or access to sensitive secrets should be denied using Pod Security Policies or the Pod Security Admission Controller.
Kubernetes multi-cluster architecture
Is it more secure to have a single cluster architecture with large numbers of nodes, or more clusters and less nodes? Multiple clusters introduce additional complexity in terms of inter-cluster networking and set-up, but generally provide more isolation than multiple workloads all running within the same mega-cluster.
There must be more attention on specific security elements in a single cluster situation. For example, you will have to manage RBAC much more delicately to ensure each developer can only access what is required, and no more, given that they are working in the same cluster as other teams. And the single cluster model also has an impact on resiliency as it represents a single point of failure. And while Kubernetes has self-healing properties within a single cluster, these properties will not fix an accidental over permission that has been taken advantage of at the level of the cluster admin. Upgrades also become much more painful when a single cluster is involved.
Multiple clusters will take up more resources than the single cluster model, but in the end it is a more resilient architecture from a security perspective for larger implementations.
To get a handle on security for larger implementations, KSOC provides Kubernetes-first cloud native security that lowers overall overhead for many of the approaches in the checklist above.
Kubernetes Network Security
Kubernetes networking is flat by default. This means that you need to add controls in order to specify how traffic can flow and which types of traffic will be blocked.
One way to isolate workloads is to follow a multi-cluster architecture. By deploying different workloads in different clusters you can ensure that security issues in one workload will not affect others. At the same time you are increasing complexity, as you have more networks to configure, more RBAC policies to define, more audit logs to monitor. If you design your clusters carefully you can achieve a high degree of isolation within your workloads at the cost of some extra complexity.
Network policies
The Kubernetes network policies can help you create better network isolation by limiting the traffic flow between pods. The network policy is akin to a dynamic firewall around each service running in Kubernetes, allowing you to specify how a pod is allowed to communicate with other network entities.
By default, pods are not isolated and accept traffic from all sources. Pods become isolated when there is a network policy in a namespace that selects them. These pods will drop traffic that is not allowed by the network policies.
Several network policies may apply to a specific pod. In such cases there are no conflicts. The union of the rules of all policies is applied; the order of evaluation does not make any difference.
Rules in a network policy are specified either for egress or ingress traffic. Thus, in order to allow a traffic flow between two pods, the egress policy has to be allowed on the source pod and the ingress policy on the destination port.
Below is an example network policy named api-allow . It limits incoming traffic to pods labeled app: shoppingcart and app: api to only those labeled with app: shoppingcart . This means that if another pod without the label of app: shoppingcart attempts to route traffic to the pod, it will be blocked.
kind: NetworkPolicy
apiVersion: networking.k8s.io/v1
metadata:
name: api-allow
spec:
podSelector:
matchLabels:
app: shoppingcart
role: api
ingress:
- from:
- podSelector:
matchLabels:
app: shoppingcart
Developers should be as granular as possible when building out network policies in Kubernetes. It is recommended to set up a policy for each namespace that denies ingress traffic by default. Then you can add policies to permit traffic only where you expect it. The same concept should be followed for egress traffic. This way you will be able to prevent an attacker from probing the network environment from a compromised container.
As a general rule, restrict pod-to-pod traffic and permit traffic only between allowed applications. The use of labels can come in handy here, as you can create a policy that allows traffic only from pods with the appropriate labels.
Finally, restrict traffic so that it is accepted only on specific ports for each application.
Kubernetes Service Meshes
Service meshes help you manage service discovery and connectivity for resources running inside a Kubernetes cluster. They simplify networking and provide monitoring and alerting features that can help you detect security threats. Kubernetes doesnʼt record network-related incidents which means that you have to use a service mesh for that purpose.
There is no native service mesh in Kubernetes, but you can choose anyone that fits you. Some service mesh projects available for use are Istio, Linkerd, and Consul. The downside of using service meshes is that you increase complexity and potentially your attack surface. If an attacker manages to breach your service mesh, they can use it to breach your entire cluster.
Kubernetes Audit Log
Like any other system, it is important to keep logs of interesting (in the sense of security) container events in your production environment. Kubernetes audit logging is essential. Such events definitely need to include the following:
- CNI Plugins: Kubernetes supports Container Network Interface (CNI) plugins. CNI plugins create a virtual network interface which can be used by containers. You can use CNI plugins to integrate Kubernetes with various third-party network configuration management tools and platforms. Available plugins include Project Calico and Cilium.
- Container start/stop events: It is important to also log the identity of the image and the user who invoked the start or stop command
- Access to secrets and sensitive resources
- Modifications of privileges
- Modification of the container payload: As part of your drift prevention strategy
- Volume mounts: In order to identify possible sensitive volumes that get mounted
- Inbound and outbound connections
- Failed actions: These might indicate attacker reconnaissance attempts, such as failed authentication attempts, attempts to open network connections, write to files, or change user permissions.
Each Docker daemon has a logging driver that is used to get all necessary information from running containers and services. The default logging driver is json-file, which writes logs in JSON format on a file stored in the container. This approach is not very flexible in terms of processing and analyzing logs, and itʼs quite risky. Logs are stored on the same container, so if the container dies, logs will die with it. It is thus recommended to use other logging drivers and mechanisms, collecting logs in a secure, central location. Subsequently, we will examine mechanisms that can be used in Kubernetes to keep and process container logs.
Logging and monitoring for suspicious activity presents new challenges in the world of containers and Kubernetes. There are two main areas of concern when we talk about logging: application logs and Kubernetes API logs.
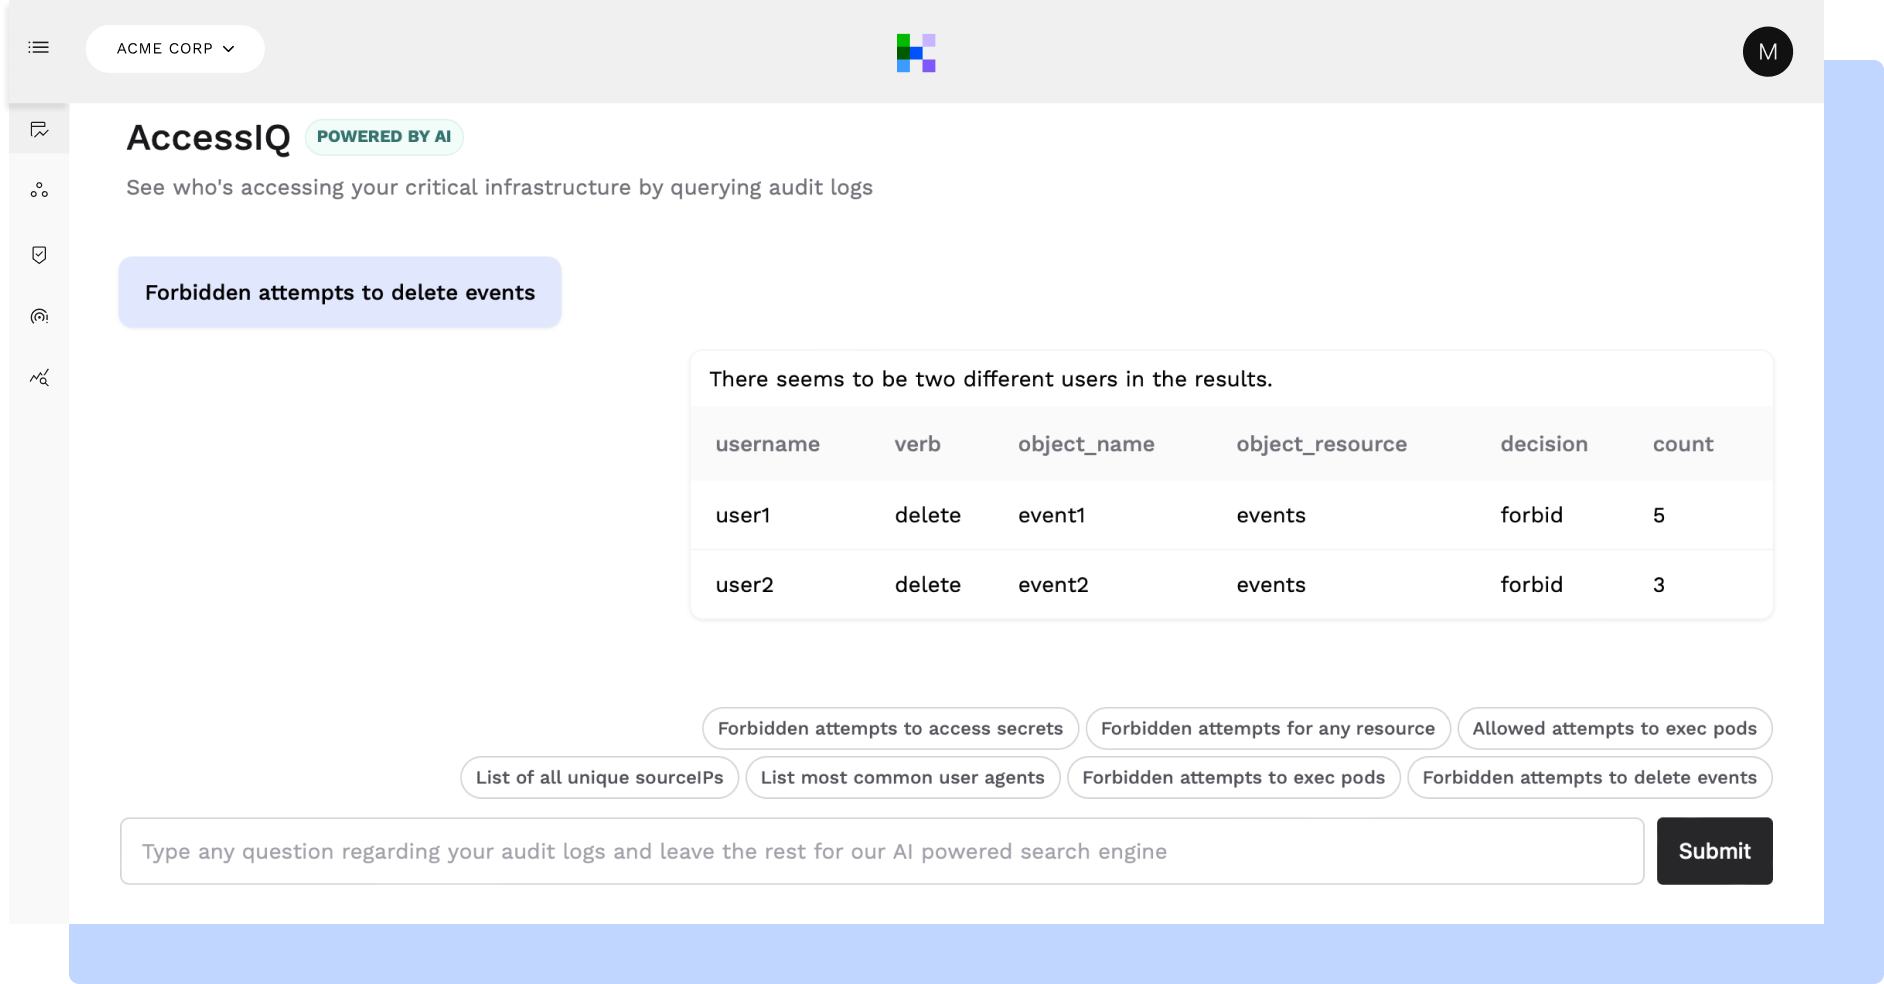
KSOC's AccessIQ feature can query audit logs for the actual usage of over-permissions.
Application Logging in Kubernetes
Application logs are useful not just for debugging applications but also monitoring cluster activity. The easiest way to get logs from containerized applications is to write to standard output and standard error streams. When using kubectl, you can tail the logs from a given pod or container through stderr and stdout.
Kubernetes does not provide a native storage solution for logs. At the same time, it is important to ship logs outside of the cluster to ensure that logs are not tampered with and that they are still available even if the container crashes or a node dies. Logs should have storage and lifecycle independent of nodes, pods, or containers; this concept is called cluster-level logging.
There are several architectures that you can use to implement cluster-level logging. The easiest way to achieve this is to directly push logs in a storage outside the scope of Kubernetes, like a centralized log management platform.
Another common mechanism for collecting and shipping application logs in Kubernetes is the sidecar pattern. A sidecar is an additional container within a pod that has a very simple job to do, such as read logs from stdout and ship them elsewhere to a log management API endpoint.
This sidecar container can be deployed with every pod to ensure that log coverage is application-wide.
Kubernetes API Server Audit Logs
Understanding what is going on in the cluster (that is, what happened, who did it, when, and how) is crucial to responding to suspicious events or generating alerts. Kubernetes offers audit logging out of the box. Auditing provides a security-relevant, chronological set of records documenting the sequence of activities that have affected the system by individual users, administrators, and applications that use the Kubernetes API, or other components of the system. It gives security teams and cluster administrators the ability to watch cluster actions and respond in the event of suspicious activity.
An audit policy in Kubernetes defines rules about what events should be recorded and what data should be included. The audit policy is defined in the audit.k8s.io API group. There are four audit levels:
None : Events are not logged.
Metadata : Only request metadata is logged, including requesting user, timestamp, resource, verb, etc.
Request: only event and request metadata
RequestResponse: event and request data plus the actual response data
Secure your “open” defaults
Always harden your Kubernetes cluster and check that your defenses are up manually. Just because a well-known cluster bootstrapping script or cloud provisioner was used to create the cluster does not mean it is secure out of the box. Many Kubelet APIs are still out in the wild without authentication. Ensure that you disable anonymous access and implement proper authorization controls.
As we've discussed, the kubelet is a very important piece of the Kubernetes architecture. It is responsible for accepting requests from the Kubernetes API on the master and maintaining overall health of the node.
Imagine if you could run any arbitrary command on a container running in your Kubernetes using the kubelet API? Sounds like a big deal, right? Well, this is how a number of Kubernetes clusters are configured by default.
In May 2022, Trend Micro used Shodan to discover more than 200,000 exposed Kubernetes clusters. The most interesting finding though was that these clusters also exposed port 10250, which is used by kubelet by default.
Usually this port is supposed to be open only internally. On top of that, a lot of these had not proper authentication and authorization mechanisms in place. Researchers analyzed the results by sending requests to the exposed Kubelets.
Many servers returned “403 – Forbidden” which means that they allowed unauthenticated, requests and the user didnʼt have the proper permissions. A server which does not allow unauthenticated requests should return ““401 – Unauthorized”. Additionally, there were some servers that returned ““200 – OK” which means that the request is allowed and commands may be executed.
Kubernetes-First Cloud Native Security with KSOC
Based on all that is required to secure a Kubernetes environment, it is clear that what practitioners need the most is a way to quickly sort through it all and understand their top risk from a Kubernetes-first perspective. That’s why the Kubernetes Security Operations Center (KSOC) maps a broad set of cluster components across the Kubernetes lifecycle using a real-time graph, cutting noise by 98% through threat vectors, highest impact remediations and Kubernetes-first incident response. KSOC is a five minute deployment into your helm charts, covering many of the specific configuration issues in this post with real-time Kubernetes Security Posture Management (KSPM) and an admission controller that allows for a dry run before you turn policies into enforce mode.
Conclusion
Basic principles of Kubernetes Security involve authentication, authorization, the handling of secrets, the Kubelet and more. By following these best practices, organizations can utilize Kubernetes securely . . . and it is so much easier to do so with a platform like KSOC that can be used by beginners as well as experts. In this past and the last post we covered the major tenets of Kubernetes security, including networking, Kubernetes security policy, authentication, authorization and more. In the next post in this series, we will talk about a factor that tends to complicate Kubernetes security even more in peoples’ minds, which is how to secure Kubernetes when it is managed in the cloud. We’ll give you a teaser; managed cloud providers do not fully manage your Kubernetes Security!